User
The User tab lets you set basic user settings. The tab consists of two sections: User, 2-factor authentication

Figure. User level management: User tab.
|
Field |
Description |
|---|---|
|
Alias |
Example: Entering an alias of Support into domain of MyDomain.com would give this user an email address of Support@MyDomain.com.
Example: support;help;bugs;info - meaning that messages to any of these accounts will be delivered to this one mailbox. Warning: Maximal length of this field is limited to 255
characters. If you want to use more aliases, you can use a pattern. |
|
Phone # |
Here you can enter the number for the user's unique SIP phone. Multiple phone numbers are supported, delimited with semicolons. |
|
Username |
This is the IceWarp Server identification name of the mailbox, which is used for authenticating access to the IceWarp Server services unless authentication is set to the Users login with their email addresses (Policies > Login Policy). In this case Alias is used (plus the appropriate domain is added). Username is usually the same as the Alias of the account, but does not have to be. Note: Regardless of the previous information, EAS always uses alias (plus @{domain}) as a username. Note: It is recommended not to use whole email addresses as usernames. In the case you want to rename a domain, you have to change domain parts of addresses manually or use SQL manager to perform mass changes. |
|
Name |
The user's real name or an identifier of the account. This field is used by WebClient and can be changed there (User's avatar > ⚙Options > Accounts > Name). The Name can be found in the "From:" header. It is shown to users that receive emails from WebClient. |
|
Description |
Enter account description. |
|
Password |
The password for the mailbox. |
|
Cloud plan |
In case you have license with the Cloud Plan enabled you can choose from Lite, Standard, Standard+ or Professional plan for the selected user. |
|
The : button |
Press this button to let IceWarp Server generate a random password for you. IceWarp Serverwill generate a password according to the password policy. If you have the password defined under Domains & Accounts > Policies > Password Policy. |
|
Permissions |
Click the button to set access rights for the account where emails are forwarded to. It is possible to set rights for either whole email account or selected folders (Inbox, Contacts, Calendar, etc.). For detailed information on permissions, refer to Permissions Tab and also see below. |
|
Photo |
Click the field to reveal the Open dialog and insert a user's photo. Note: This photo (as well as one in the IW WebClient - My Details dialog) can be synchronized from a directory server. In this case, the figure is expected to be stored within the LDIF attribute of thumbnailPhoto (AD default) in the JPEG format. (Other formats supported by AD - e.g.: PNG - are not fully supported by IceWarp Server, though WebClient can display them correctly.) |
|
2-factor authentication |
This field informs you whether 2-factor authentication is enabled for the user and what type of authentication is set-up (SMS or via authenticator). Click the Reset... button if you want to reset user's 2-factor authentication setup. Reset button is disabled if 2-factor authentication is not configured. Then you can see label "Not enabled" in both lines - 2-factor authentication and SMS authentication. |
For more information about personal data synchronization with AD/LDAP, refer toPersonal Data Synchronization.
Permissions
Click Permissions button to see list of folders: TeamChat, Groupware and IMAP.
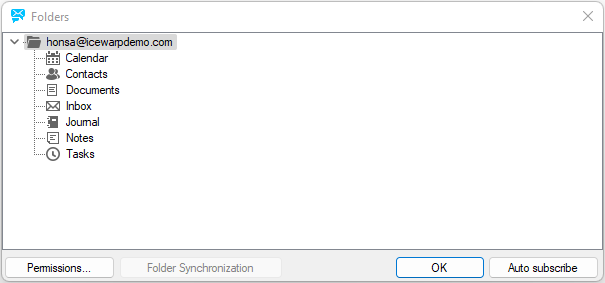
Figure. User tab: Folders view.
Permissions Dialog
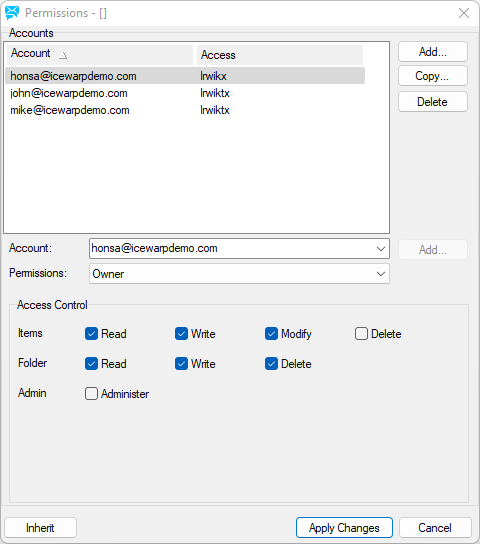
Figure. Folders view: Permissions dialog.
|
Field |
Description |
|---|---|
|
Account/Access |
List of individual members with their access rights. |
|
Add button |
Click the button to open the Select Item dialog where you can select accounts (both individual and group ones). For more details about this dialog, refer to User Groups. You can also fill in an account that is not in the Select Item dialog list into the Account field and click this button to add it directly. The Select Item dialog is not opened in this case. |
|
Copy button |
Select an account from the list and click the button to copy the selected account rights. The Select Item dialog opens - here select a user or group you want to grant the copied rights to. |
|
Delete button |
Click the button to delete an account from the Account/Access list. |
|
Account |
The selected account is shown. (Also use to select Everyone.) Click the Add button next to the field to add it into the list. |
|
Permissions |
Here you can select one of mostly used rights combinations. Optional. Following permission can be selected from preset permissions: None, Read, Write, Owner, All, Full or you can select your own individual permission so then it is Custom selection. |
|
Access control |
Select the appropriate access rights. For detailed description of access rights in this panel, refer to Access Rights. |
|
Inherit button |
Click the button to inherit access rights from the folder's parent. Note: If used for the root folder, no access is granted. Note: Changing of any access rights for a folder that has inherited its rights from its parent removes this inheritance |
|
Apply changes |
Click the button to save the performed changes. |
Access control table is divided into 3 groups regarding permissions for Items, Folder and Admin. Depending on the selected permission, individual access control rights are checked and applied. Access Control Rights can be different for TeamChat, GroupWare and IMAP folders.
List of Access Rights for GroupWare Folders
|
Items |
Description |
|---|---|
|
Items - Read |
right only to read GroupWare items and entries |
|
Items - Write |
right to create, write and edit own items in GroupWare folders |
|
Items - Modify |
right to edit and modify own and another users GroupWare items and entries |
|
Items - Delete |
right to delete own and another users GroupWare items and entries |
|
Folder - Read |
right to read a name of GroupWare folder |
|
Folder - Write |
right to create a new folder |
|
Folder - Delete |
right to rename, move and delete GroupWare folder |
|
Admin - Administer |
full right to set permissions for another users |
List of Access Rights for IMAP Folders
|
Field |
Description |
|---|---|
|
Items - Read |
right only to read the items and entries inside IMAP folder |
|
Items - Insert |
right to insert a new item |
|
Items - Write |
right to edit items completely - including setting or clearing flags other than seen and deleted |
|
Items - Delete |
right to delete items from the public or shared folder (a folder owner has full rights) |
|
Items - Post |
right to send an email via SMTP, included for compatibility with IMAP clients |
|
Items - Keep Seen |
right to mark a message as read - only for non-groupware folders |
|
Items - Expunge |
mails can be removed from a folder (Inbox, Sent,
...) and sent to Trash for example versus deleted at all; this right
allows final deleting of mails |
|
Folder - Lookup |
basic right just to see IMAP folder (not to see items); this allows users to open subfolders they can be granted access to |
|
Folder - Create |
right to create a new folder |
|
Folder - Delete |
right to delete a folder |
|
Admin - Administer |
full rights to set the permissions for another users |
List of Access Rights for TeamChat Folders
|
Field |
Description |
|---|---|
|
Items - Read |
right only to read TeamChat items and entries |
|
Items - Write |
right to write and edit own items |
|
Items - Modify |
right to edit and modify own and another users TeamChat items and entries |
|
Items - Delete |
right to delete own and another users TeamChat items and entries |
|
Items - Edit docs |
right to edit own and another users TeamChat documents |
|
Folder - Read |
right to read a name of TeamChat folder |
|
Folder - Write |
right to create a new folder (it cannot be applied for ChatRoom) |
|
Folder - Rename |
right to rename TeamChat folder |
|
Folder - Delete |
right to delete and move TeamChat folder |
|
Admin - Invite |
right to invite someone to TeamChat |
|
Admin - Kick |
right to kick someone from TeamChat |
|
Admin - Administer |
full rights to set the permissions for another users |

